前回、MinGW環境からWSL環境に乗り換えましたが、それに伴ってエディタをAtomからVScodeに変えました。理由としてはデバックが容易というのが一番大きいです。
さて、windows側ではデバッグが動いているところまでできたので、次はMac上での環境を整えていきます。
環境
- OS: macOS Catalina ver.10.15.4
- VScode: ver.1.45.1
- コンパイラ: gcc (not clang)
1.複数環境にまたがる場合の書き方
私の環境では、競技プログラミングで書いたコードはすべてOneDrive上で共有しています。また、VScodeに追加したワークスペースは、その共有しているディレクトリになっています。
そのため、windowsで環境構築したときにできたtasks.jsonやlaunch.jsonも一緒に共有されます。そのため、これらに追記する必要があります。
書き方は簡単です。tasks以下に{}をつけて最後に","をつければ新しいプロパティを書き足す事ができます。具体例としてtasks.jsonの一部を以下に示します。
{
    "version": "2.0.0",
    "tasks": [
        {
            "label":"build on mac",
            "type":"shell",
            "command":"g++",
        },

        {
            "label": "build on windows",
            "type": "shell",
            "options": {
                "shell": {
                    "executable": "C:\\Windows\\System32\\wsl.exe",
                }
            },
            "command": "g++",
        }
    ]
}
あとは、VScodeで「どっち使う?」とプルダウンメニューが出てくるので、環境に合わせたほうを選べばちゃんと動きます。
2.c_cpp_properties.jsonを設定する
{
    "configurations": [
        {
            "name": "WSL",
            "intelliSenseMode": "gcc-x64",
            "compilerPath": "/usr/bin/gcc",
            "includePath": [
                "${workspaceFolder}/**"
            ],
            "defines": [],
            "cStandard": "c11",
            "cppStandard": "c++17"
        },
        {
            "name": "Mac",
            "includePath": [
                "${workspaceFolder}/**",
                "usr/local/include/**"
            ],
            "defines": [],
            "macFrameworkPath": [
                "/Library/Developer/CommandLineTools/SDKs/MacOSX.sdk 1/System/Library/Frameworks"
            ],
            "compilerPath": "/usr/local/bin/g++",
            "cStandard": "c11",
            "cppStandard": "c++17",
            "intelliSenseMode": "gcc-x64"
        }
    ],
    "version": 4
}
上部分がwindowsで使う設定、下側がmacで使う設定になります。
3.tasks.jsonを設定する
{
    "version": "2.0.0",
    "tasks": [
        {
            "label":"build on mac",
            "type":"shell",
            "command":"g++",
            "args":[
                "-std=c++17",
                "-g",
                "-O0",
                "-o",
                "'${workspaceFolder}/problem.out'",
                "'${file}'",
            ],
            "group": {
                "kind": "build",
                "isDefault": true
            }
        },

        {
            "label": "build on windows",
            "type": "shell",
            "options": {
                "shell": {
                    "executable": "C:\\Windows\\System32\\wsl.exe",
                }
            },
            "command": "g++",
            "args": [
                "-std=c++17",
                "-g",
                "-O0",
                "-I/opt/boost/gcc/include",
                "-L/opt/boost/gcc/lib",
                "-o",
                "`wslpath",
                "'${workspaceFolder}\\problem.exe'`",
                "`wslpath",
                "'${file}'`",
            ],
            "group": {
                "kind": "build",
                "isDefault": true
            }
        }
    ]
}
今度は上がmacで使う設定、下がwindowsで使う設定です。
4.launch.jsonを設定する
今回最も詰まった部分です。macOS CatalinaではMicrosoft C/C++ for Visual Studio Code Extensionが正常に動きません。ブレークポイントを素通りしたりします。私の環境でも動きませんでした。
そのため、新しく拡張機能から"codeLLDB"を入れる必要があります。
インストールが完了したらlaunch.jsonを記述します。
{
    "version": "0.2.0",
    "configurations": [
        {
            "name": "(lldb) on Mac Launch",
            "type": "lldb",
            "request": "launch",
            "program": "${workspaceFolder}/problem.out",
            "args":[],
            "cwd": "${workspaceFolder}",
        },

        {
            "name": "(gdb) Bash on Windows Launch",
            "type": "cppdbg",
            "request": "launch",
            "program": "${command:extension.vscode-wsl-workspaceFolder}/problem.exe",
            "args": [
                "<",
                "${command:extension.vscode-wsl-workspaceFolder}/problem.in"
            ],
            "stopAtEntry": false,
            "cwd": "${command:extension.vscode-wsl-workspaceFolder}",
            "environment": [],
            "externalConsole": true,
            "pipeTransport": {
                "debuggerPath": "/usr/bin/gdb",
                "pipeProgram": "${env:windir}\\system32\\bash.exe",
                "pipeArgs": [
                    "-c"
                ],
                "pipeCwd": "/"
            },
            "setupCommands": [
                {
                    "description": "Enable pretty-printing for gdb",
                    "text": "-enable-pretty-printing",
                    "ignoreFailures": true
                }
            ],
            "sourceFileMap": {
                "${command:extension.vscode-wsl-workspaceFolder}": "${workspaceFolder}"
            },
        }
    ]
}
上がmac用の設定、下がwindows用の設定です。
大きな変更点は6行目のtypeをcppdbgからlldbに変えた点です。これを変えるとVScodeが波線を引く部分があるので、それをすべて削除します。
5.試運転
試しにブレークポイントを貼ってdebugしてみます。手順は
- ビルドする(このとき環境にあっている方を選ぶ)。ショートカットキーはcmd+shift+b
- debugモードにする。(ショートカットキーはcmd+shift+d。または、VScodeの一番左側のアクティビティバーの上から4番目のアイコンをクリック)
- ブレークポイントを貼る
- デバッグモードで実行する
- ブレークされている確認
試しにやってみると、次のようになります。
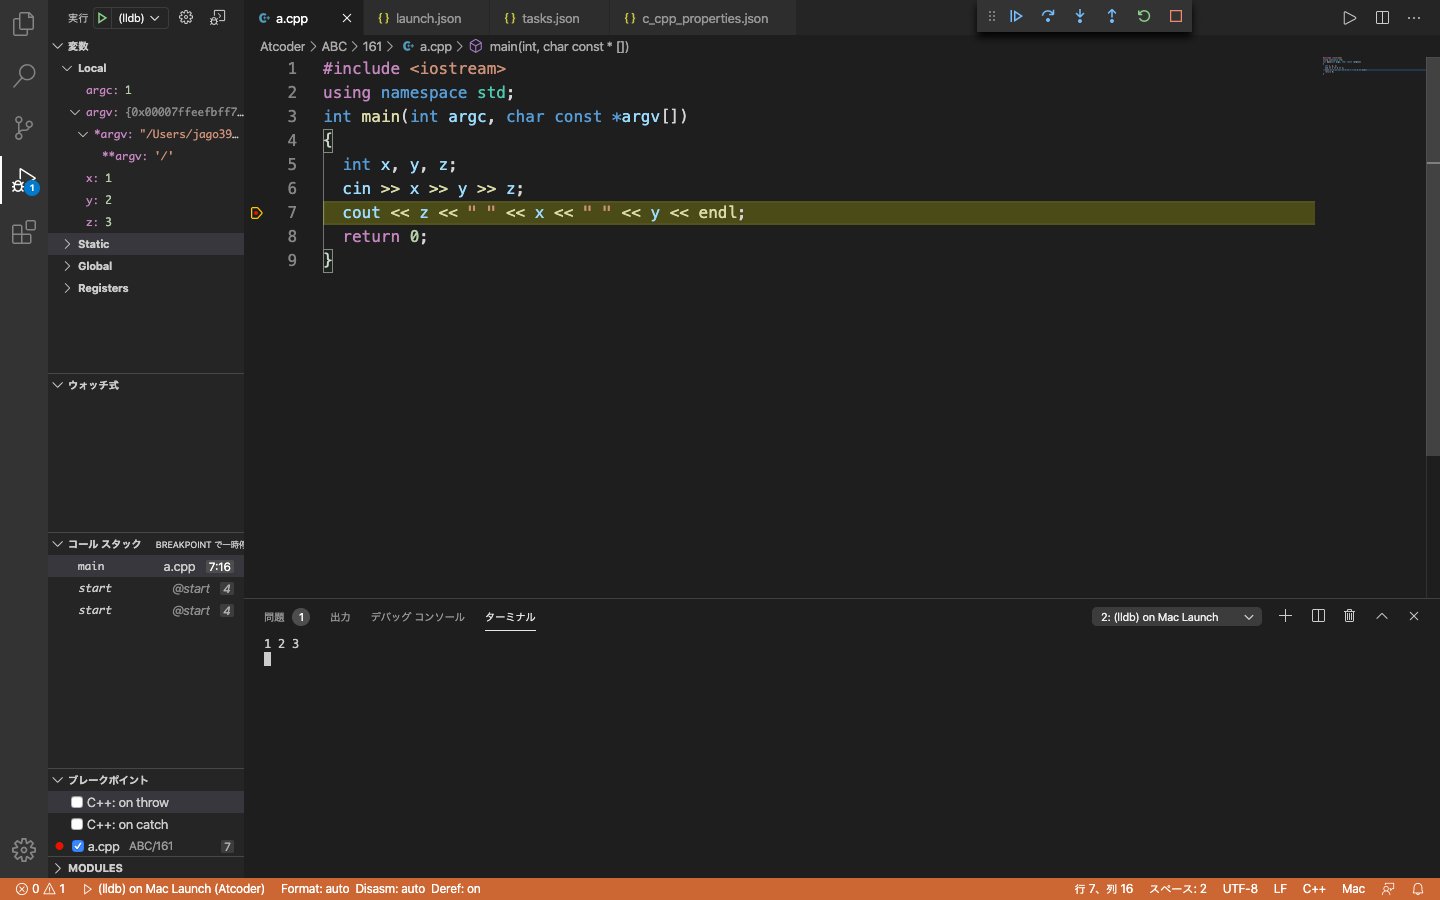
cinなど標準入力がある場合は、VScodeのコンソールから入力できます。実行すると勝手にターミナルに画面が遷移するので、かゆいところに手が届くなという感想です。
6.おわりに
ブレークポイントが動かないなどなどでMacでの設定に1日かかりましたが、これでwindowsとmac両方にデバッグできる環境ができました。これやっててC問題埋めをサボっていたので、また埋めていきたいと思います。